Finished fortifications.
Every cell in the game can have fortifications on each of its hexsides from level 1-10. However only forts up to level 3 can be built during the game, the other levels are reserved for major fortification systems built in peace time like the Maginot Line. These can only be built in the editor.
This following enhancements were made:
1) Enemy units invading an occupied hex across a hexside that has fortifications will automatically be fired upon by the forts. The forts increase both the hard and soft attack factors of the defending units. Forts can be reduced by enemy engineers.
2) A new brigade type was added, engineers. These are similar to infantry but they have some short range heavy weapons with anti-armor capability. They also have a number of special abilities including building fortifications, reducing enemy fortifications and bridging rivers (not yet implemented).
3) A new strategic command was added, build forts. Any time an unmoved unit that has brigades with this ability in a non-combat hex and has adequate supply and energy, it can attempt to increase the fortification level of one hexside up to a maximum of level 3. There is a percentage chance depending on the number of brigades involved but whether it works or not it will consume a large number of supplies and energy.
4) A new operational command was added, reduce forts. An invading unit with engineer brigades entering a fortified hexside can attempt to reduce it. This also has a percentage chance of success and will result in some casualties. This will also increase the recon level of the unit which will increase the likelyhood of future success.
Next up...
Victory conditions
Monday, July 16, 2012
Tuesday, June 26, 2012
Unit Production
Unit production is mostly complete pending a few tweaks. Here's a summary taken from the manual:
Unit production is handled in the Unit Production Toolbar. This can be activated by clicking the tank symbol on the main control toolbar:
The Unit Production Toolbar is divided into 3 areas:
1) Resource summary - This shows all of the available resources for building units (men, afvs, planes, etc.)
There are 4 lines:
2) Available units - This shows a summary of all the available units that can be built along with details as to their commanding unit, resources needed, earliest arrival turn, etc. Clicking on the categories above the units will toggle each type on and off. Clicking on the page up and page down arrows will page through them. Right clicking will go to the start / end of the list. Clicking on a header will sort by the data in that column.
Of special note is the Avail T (available turn) column. This column indicates the first turn that the unit will become available. Even if all the resources required to build a unit are on hand, it still will not be deployed until this turn so it is better to wait until you are close to the available turn of a unit before moving it to the production queue.
The unit name shows the HQ in parentheses after it. If the HQ is not currently on the map, it will also show an asterix. To create a unit, click on its name. The Unit Production Toolbar will temporarily close and the map will have all available deployment cities highlighted. Clicking on one of these cities will set that as the deployment city. The toolbar will reopen and the unit will be moved to the bottom of the ‘in production’ queue. Clicking anywhere else on the map will cancel the build and reopen the toolbar.
3) In Production - This shows a list of all units currently in production including their progress, arrival city, earliest build turn, etc. They are sorted in order of priority and will be filled with available resources in the order shown. The two numbers separated by the ‘/’ symbol indicate the number assigned / number needed to complete the unit. Units are filled at the beginning of each turn from available resources in the order they appear in this list. The Build T column indicates the number of remaining turns until the unit is ready to be deployed.
Units can be moved up and down through the list by clicking on the arrows in the Order column. Right clicking moves them to the beginning / end.
As with the available units, categories can be turned on and off by clicking on the category tag above the list and the page buttons will move up and down through the list. The deployment city is shown in the City column. Clicking on it will temporarily hide the toolbar and center the map on this city.
To cancel a unit, click on its name. This will move the unit back into the available queue. However, any resources assigned to the unit will be moved to the ‘in transit’ category and be unavailable for a turn.
Unit production is handled in the Unit Production Toolbar. This can be activated by clicking the tank symbol on the main control toolbar:
The Unit Production Toolbar is divided into 3 areas:
1) Resource summary - This shows all of the available resources for building units (men, afvs, planes, etc.)
There are 4 lines:
1) Prod Rate - This shows the number of new soldiers being trained each turn and the number of key equipment types being produced.
2) Reserved - This shows the percentage of each type being reserved for new unit creation (as opposed to reinforcement). Left clicking on the +/- buttons will increase/decrease the percentage by 1. Right clicking will increase/decrease by 10.
3) Available - This shows the number currently available for building units. They will be applied to units in the production queue at the beginning of next turn.
4) In Transit - When you cancel a unit that is in production, all men and equipment are considered ‘in transit’ for a turn. Also, when units are destroyed in combat, some soldiers will make their way to the in transit queue. Finally, disbanded units send their men and equipment to the in transit queue. They will be transferred to the available queue at the beginning of next turn.
2) Available units - This shows a summary of all the available units that can be built along with details as to their commanding unit, resources needed, earliest arrival turn, etc. Clicking on the categories above the units will toggle each type on and off. Clicking on the page up and page down arrows will page through them. Right clicking will go to the start / end of the list. Clicking on a header will sort by the data in that column.
Of special note is the Avail T (available turn) column. This column indicates the first turn that the unit will become available. Even if all the resources required to build a unit are on hand, it still will not be deployed until this turn so it is better to wait until you are close to the available turn of a unit before moving it to the production queue.
The unit name shows the HQ in parentheses after it. If the HQ is not currently on the map, it will also show an asterix. To create a unit, click on its name. The Unit Production Toolbar will temporarily close and the map will have all available deployment cities highlighted. Clicking on one of these cities will set that as the deployment city. The toolbar will reopen and the unit will be moved to the bottom of the ‘in production’ queue. Clicking anywhere else on the map will cancel the build and reopen the toolbar.
3) In Production - This shows a list of all units currently in production including their progress, arrival city, earliest build turn, etc. They are sorted in order of priority and will be filled with available resources in the order shown. The two numbers separated by the ‘/’ symbol indicate the number assigned / number needed to complete the unit. Units are filled at the beginning of each turn from available resources in the order they appear in this list. The Build T column indicates the number of remaining turns until the unit is ready to be deployed.
Units can be moved up and down through the list by clicking on the arrows in the Order column. Right clicking moves them to the beginning / end.
As with the available units, categories can be turned on and off by clicking on the category tag above the list and the page buttons will move up and down through the list. The deployment city is shown in the City column. Clicking on it will temporarily hide the toolbar and center the map on this city.
To cancel a unit, click on its name. This will move the unit back into the available queue. However, any resources assigned to the unit will be moved to the ‘in transit’ category and be unavailable for a turn.
Next up fortifications....
Friday, June 15, 2012
More optimization results
I created sort of a super scenario to test my optimizations. I've beefed up both sides by about 5x and France now has an army of 231 corps containing 924 divisions totaling over 11 million men! The actual French Army in WWII consisted of about 123 divisions so this mock up is approximately 7 1/2 times as large.
.png)
This is just to see if my supply system is large enough to handle a very large army.
Anyway, here's the timing logs before optimization:
111661852| 0|Supply Points to Units
111704450| 42598|Depots to Units
111727008| 22558|Depots to Units
111756022| 29014|Rail to Units
111773117| 17095|Cities to Depots
111775071| 1954|Depots from cell
The first column shows the clock, the second the time elapsed since the last log and the third a description of what happened. Note, the time for an action appears on the line AFTER the description. The total of the 4 highlighted actions is 111,265 milliseconds or about 1 minute 50 seconds. Total time for the complete cycle is about 2 minutes.
Here's the same timing log after optimization:
33627270| 0|Supply Points to Units
33627866| 596|Depots to Units
33628545| 679|Depots to Units
33628928| 383|Rail to Units
33637130| 8202|Cities to Depots
33639272| 2142|Depots from cell
We are now down to a very reasonable 9860 milliseconds or about 10 seconds. Total time for the complete cycle is now about 19 seconds.
This can be cut down even further and will probably have to be once Russia comes on board but for now its good enough to not get in the way of further development.
So I'm on to the next stage:
Unit production....
Wednesday, June 13, 2012
Some new screenies
I've completely reworked Spain and built out France as a complete nation. This was needed to support the new supply network, otherwise French troops ran out of supplies very quickly and were easily defeated by well supplied Spanish troops.
Here are some screenies:


Here are some screenies:

This shows the new peak layer which was surprisingly difficult to do. After trying various overlay techniques, I found that cloning the mountain layer to another layer with a bluish white overlay and a large bluish white outer glow provided the best effect. I also had to darken the mountains a bit to provide enough contrast.

This shows the peaks in the Alps.

Zoomed out view of France showing the large rail network and cities.

This is zoomed in a bit more to show the new look of the rail. Finally was able to get a double rail look by using a 5 pixel line followed by a 2 pixel eraser. The ties are a custom brush that had to be recreated after my hard drive disaster wiped out all of my photoshop brushes. Finally realized to take notes on all these effects and save off custom brushes as separate files so I can recover them next time.
Tuesday, June 12, 2012
Some optimization results
Well the first stage of my optimization has been a resounding success. I changed the way I check whether units are in range of their HQ at the begining of a turn. This determines command for the entire turn which has a wide range of implications including morale, organization and the ability to execute advanced commands.
I dropped the time it took to calculate the French side (3 HQ's and 31 corps) from 7.5 seconds to 0.4 seconds. If we assume about 600 Corps for the peak of the Soviet Army, we get about 7.7 seconds which is reasonable. The previous method would have been an excruciating 2 minutes and 25 seconds!
How did I get such an increase in efficiency? Well it was quite simple, I quit doing it the stupid way.
I have 2 basic functions that represent the core of the map navigation capabilities in my game:
1) GetPath - Given a unit, a target and a command (move, advance, air transport, sea transport, etc) it will return the most efficient path as a vector of cells.
2) GetCellsInRange - Given a unit, a command and a range, it will return a vector of all cells reachable with those constraints.
Interestingly enough, (2) takes approximately as long as finding a path to the furthest cell in the range. In fact, (1) can be implemented by first executing (2) and then walking back from the target cell to the starting cell by always going to the neighbor cell with the lowest total travle cost (this is essentially Dijkstra's Algorithm). It CAN be implemented that way, but it isn't because that would negate the efficiency of the A* algorithm which starts with Dijkstra's algorithm and adds a constraint that cuts down on the number of wasted cells that must be checked.
Before I optimized, I used the rediculously slow method of cycling through each unit and trying to plot a path back to its HQ. I switched this around and went to each HQ and found all cells within the HQ's command range and marked them. Then I simply cycled through each of the HQ's children and checked if that cell had been marked as in range. For the example above, this reduced the number of path checks from 31 to 3. But its even bigger than that because units that were far from their HQ would have been even more inneficient under the old system. And HQ's that happen to be in low mobility territory like mountain ranges would be extremely quick to calculate.
My next step is to apply the same idea to locating supply cities. Like before, I was cycling through each city and attempting to plot a rail path back to the capital. I will attempt to switch it around and use (2) starting from the capital to identify all supply cities.
Monday, June 11, 2012
Supply and reinforcement done... sort of
Supply and reinforcement is functionally complete but it is extremely slow.
I like the functionality and I've built out France to be a complete nation so that the French troops will have their own supply chain while they invade Spain in my mythical test scenario.
Normally, it is considered bad form to optimize prematurely. There are a lot of good reasons for this, the biggest being that you are likely to make changes down the road that will force you to re-optimize later.
However, I've decided to bite the bullet and tackle it now for a couple of reasons:
1) It is so slow that it will make testing everything painful. This will cause a development inefficiency as I have to wait every time I hit the new turn button.
2) It is slow even with the relatively small countries and armies of France and Spain. What happens when I get Russia built out with a 4 million man army??? If I can't make it fast now, I'm in big trouble when the complete game is done. Might as well find out now if my supply chain system is just flat out too slow and needs to be scrapped and re-written.
3) Most of the optimization should be doable by simply caching the previous supply chain and then having some sort of test to determine how much of it needs to be recalculated. This is fairly straightforward.
4) The supply chain code is fresh in my mind right now. If I come back to optimizing it in 3 months, I will need to bring myself back up to speed.
So, taking that all into account, I'm extending this release to include an optimized supply chain procedure...
Tuesday, May 15, 2012
Supply and Production
I had a catastrophic crash of my laptop. I re-installed the OS and drivers and downloaded all 85gig of my backup from Carbonite only to discover that my hard drive was bad. I've ordered a new one and continued development knowing that at any moment my laptop may crash and be unrecoverable.
Thank God for backups!
The one item lost was about 3 hours of map work in a Photoshop file that appears to be corrupted. In addition, I had about 3-4 days of downtime between when the trouble started and when I was able to get coding again.
I have made some progress on the next stage, supply and production.
From the manual:
At the beginning of each nation turn, the supply network is recalculated. It can be displayed by toggling on ‘RRS’ view (Rail / Resource / Supply) view with the ‘R’ key. All areas in supply will be highlighted in green or blue green as described below.
The supply system in Grand Strategy WWII consists of 3 parts:
By default it is the active capital. However, the user has the option of moving the supply root. This can be done from the control page of the cell details screen of the new supply hub location. Moving the supply root has a cost and should only be done as a last resort. Between 10% and 30% of each resource will be lost in this transfer. In addition, 2 entire turns worth of rail transport points will be consumed by the move making rail transport unusable for at least the next 2 turns.
Each Supply Point has a priority level which can be None, Low, Medium, or High. These determine how much supply and reinforcements will be routed to them each turn. This can be done from the control page of the cell details panel.
2) All manufacturing facilities will use supplies on hand to produce manufactured goods.
3) Manufactured goods will then be transferred to supply points based on their respective supply levels.
4) Supplies and reinforcements will then be transferred to mobile supply points based on their respective supply levels.
5) Supplies and reinforcements will then be transferred to units within range of the supply network based on need.
6) Supplies and reinforcements will be transferred from mobile supply units to units within their command and supply range.
7) Supplies will be transferred from mobile supply units to units within their supply range that are not in same command.
Here are some screen shots to illustrate:
.png)
.png)

Thank God for backups!
The one item lost was about 3 hours of map work in a Photoshop file that appears to be corrupted. In addition, I had about 3-4 days of downtime between when the trouble started and when I was able to get coding again.
I have made some progress on the next stage, supply and production.
From the manual:
At the beginning of each nation turn, the supply network is recalculated. It can be displayed by toggling on ‘RRS’ view (Rail / Resource / Supply) view with the ‘R’ key. All areas in supply will be highlighted in green or blue green as described below.
The supply system in Grand Strategy WWII consists of 3 parts:
1) Supply Root
The supply root is the central hub of the supply network. This is shown by a yellow border around the hex when in RRS view. This must be a city connected to rail or a sea port. The Supply Root is the central control location for all supply related activity. All supply flows through this location. It should be protected at all costs.By default it is the active capital. However, the user has the option of moving the supply root. This can be done from the control page of the cell details screen of the new supply hub location. Moving the supply root has a cost and should only be done as a last resort. Between 10% and 30% of each resource will be lost in this transfer. In addition, 2 entire turns worth of rail transport points will be consumed by the move making rail transport unusable for at least the next 2 turns.
2) Supply Points
Every city controlled by the nation that can trace a path through either friendly, undamaged rail and / or sea ports to the supply root constitute a Supply Point. These are displayed with a black border. The Supply Root is also a Supply Point. Each Supply point provides a transportation network to and from all of the cells within its supply range. All cells in range of supply points will be displayed with a green highlight. Clicking on a city while in RRS mode will highlight the specific hexes in range of that city.Each Supply Point has a priority level which can be None, Low, Medium, or High. These determine how much supply and reinforcements will be routed to them each turn. This can be done from the control page of the cell details panel.
3) Mobile Supply Points
Each supply unit provides mobile supply to the surrounding hexes within its supply range. These are shown as blue green highlights. Selecting the supply unit will highlight its specific cell range.Flow of Resources and Supply
1) All resources in supply range (green) will be transferred each turn to the supply network and from there to the various factories that use them.2) All manufacturing facilities will use supplies on hand to produce manufactured goods.
3) Manufactured goods will then be transferred to supply points based on their respective supply levels.
4) Supplies and reinforcements will then be transferred to mobile supply points based on their respective supply levels.
5) Supplies and reinforcements will then be transferred to units within range of the supply network based on need.
6) Supplies and reinforcements will be transferred from mobile supply units to units within their command and supply range.
7) Supplies will be transferred from mobile supply units to units within their supply range that are not in same command.
.png)
This shows the green and blue green areas which show main supply and mobile supply.
.png)
This shows the mobile supply area for the selected supply unit. This us useful when two or more mobile supply units areas overlap. Since combat units can only draw reinforcements from a mobile supply unit in the same command tree, it is important to know if you are in range of your mobile supply unit.

Here, units have been hidden to show the supply root (Madrid) shown with a yellow stroke and other supply points shown with a black stroke.
Sunday, May 6, 2012
Version 0.1.4.7 Completed
Sound.
I got some very good advice from an industry insider about the proper way to implement sound in a strategy game. I decide to go ahead and implement that right away in case there were some issues with the game library I'm using. It was pretty straightforward and I implemented both movement and combat sound.
Now I can get back to production and supply....
Saturday, May 5, 2012
Version 0.1.4.6 Completed
Fixed a few minor display issues. Most importantly some layout issues with the unit placement panel.
Key changes:
Added command highlighting.
Clicking on an HQ will show all units within command range with green highlight and those outside of command range as grey. Clicking on a unit will show its command unit in red and siblings in blue. Clicking on an HQ and pressing the 'D' key will show the command range of the HQ as yellow for 5 seconds.
Added supply corps under HQ.
This corps acts as the supply / reinforcement center and moves independently of the HQ. All supplies and reinforcements will go through this unit to the individual corps.
Added HQ effects.
Units in HQ range will now get a boost to organization and morale at the beginning of each turn. Those outside of command range will not. This can be a deciding factor in combat and allows retreating and broken units to recover.
Added HQ specific command matrix.
This adds the ability to add commands that are specific to an HQ. The first one added is combined arms which allows the sharing of recon between units in command that are participating in a combined arms assault. Requirements also include at least one armor / mech and one infantry unit.
Added Entrench command.
This command allows units that don't move to 'dig in' for better defensive ability. Happens automatically to a point for a unit that doesn't move. Can be increased further by explicitly entrenching. Uses up all available movement.
Fleshed out Cell Details panel.
This is now a two page panel consisting of an Overview and a Production page. The overview contains all pertinent cell details while production is a placeholder for the production model. Also added more cell details to the combat panel.
Tuesday, April 24, 2012
Here is an update on version 0.1.4.5
Adding combat caused a lot of problems with playback. These have been fixed along with adding combat summary for each battle.
2 new strategic commands were added: defend and delay. These allow a player to plot a retreat path for a unit so that it can make an orderly withdrawal from combat before being forced to make a hasty retreat.
The difference between the two is the moral threshold that needs to be reached in order to trigger the withdrawal.
Next up is rail movement which includes a lot of infrastructure to be used for all transport types (rail, ship, amphibious, air, airborne).
Rail movement is allowed along connected paths of rail hexes that are all controlled by the units alliance and are not damaged.
The unit may embark and disembark from any rail hex (does not need to be a city). However, the level of infrastructure in that hex will directly impact the number of movement points consumed by the unit. It will be much more efficient to load and unload in a major metropolitan area than out in the middle of nowhere. All units will take an organization hit when they disembark which is again dependent on the level of infrastructure in that cell.
Each city has a rail capacity that is shared across the rail network. The nation's total rail capacity is the sum of these. As a nation loses cities, it will also lose rail capacity. Units using rail transport will consume the nation's rail capacity every time they embark, disembark and move by rail. The cost in terms of rail capacity depends on the sum of the cost of each brigade. HQ's are almost free while mechanized units are much more expensive. Once a nations capacity reaches 0, no more rail movement will be allowed that turn. However, units will still be able to disembark at this point but it will consume next turns rail capacity. This means its possible to start a turn with less than full capacity remaining or even in extreme cases negative rail capacity. In the latter case, no rail movement would be allowed that turn.
Any unit that ends its turn still in rail transport mode is vulnerable to attack by an enemy unit. If any enemy combat unit enters the hex, the rail unit will be forced to immediately disembark with a major hit to organization and a smaller hit to moral and a situational awareness level of 0. This will leave the unit very vulnerable to attack. The nations rail capacity will also be affected.
The next big development task will be HQ's.
I will be adding the following brigades to each HQ that travel with it:
1) Staff brigade - this represents all of the officers and their staff.
2) Fuel depot
3) Ammo depot
4) Supply depot
5) Reinforcements (Men)
6) Reinforcements (AFV's)
Here are some recent screen shots showing the latest release in action (0.1.4.5):


The scattered Spanish forces are using rail to rush to the front indicated by the dark grey arrows. The rail symbol over the unit indicates that it is currently using rail transport. Rail is limited and both the size of the unit and the distance it travels use up the nation's rail allotment. Each city has a rail capacity and the nation's total rail capacity each turn is determined the sum of the cities it controls. Note the HQ for this unit is highlighted in red and its siblings in blue. This makes it easier to keep HQ's with their forces. The yellow caution sign shows damaged rail under repair. This is currently unusable for rail transport.


This shows the editor in unit placement mode. The last of the French units are being assembled for invasion. The number in the upper left hand corner indicates the size of the stack with a maximum of 6 units. The tab key cycles through the stack.

The play button has been pressed and the game is starting with the French crossing the frontier into Spanish territory. The yellow arrow indicates this unit is advancing through enemy territory which is slower and uses more resources than advancing through friendly territory.

The Pyrenees Mountains are impassable in the center. Most of the units are heading through the passes in the north but one infantry unit is circling around to attack Barcelona from the east. The green arrow indicates friendly territory.
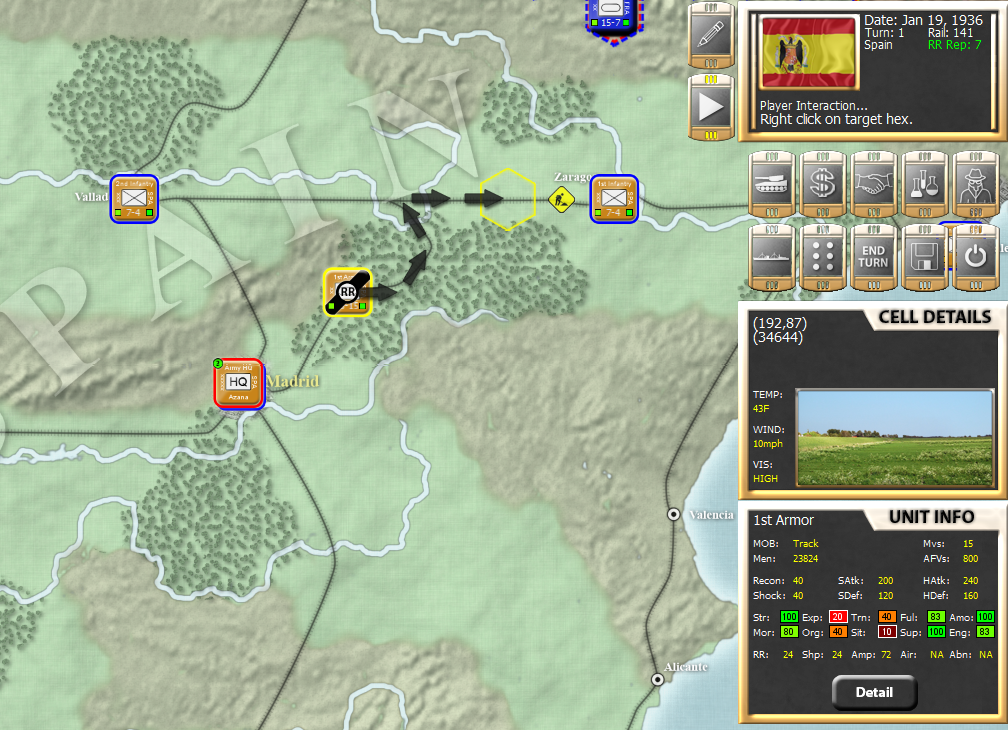
The scattered Spanish forces are using rail to rush to the front indicated by the dark grey arrows. The rail symbol over the unit indicates that it is currently using rail transport. Rail is limited and both the size of the unit and the distance it travels use up the nation's rail allotment. Each city has a rail capacity and the nation's total rail capacity each turn is determined the sum of the cities it controls. Note the HQ for this unit is highlighted in red and its siblings in blue. This makes it easier to keep HQ's with their forces. The yellow caution sign shows damaged rail under repair. This is currently unusable for rail transport.

This shows one of the 5 pages of unit data. They are overview, combat, status, supply and transport. The color coding allows a quick view of the status. Green is 100% and it changes to yellow, orange, red and finally black as you drop down to 0. The same color coding is used on the units. The bottom left indicates overall strength while the lower right indicates supply.

This is a zoomed out view (there are 7 zoom levels) with the grid enabled.

This shows the aftermath of a battle. The French have taken control of the hex and the retreating Spanish 6th Infantry Corps is in bad shape. One of its brigades is shattered and several more are retreating causing the entire corps to retreat to safety. Even one of the supporting artillery units has been overrun and severely damaged. The combat summary is shown at the top of the combat results and you can scroll down through the pages of detail to get a blow by blow description of the events. FOW is set to none so enemy units in a combat hex can be seen in detail.

Turn 3 and the French have cleared the mountains and begun to put a lot of pressure on the Spanish. The river provides some protection and the Spanish are attempting to assemble a defensive line behind it but will eventually have to fall back all the way to Madrid where the final battle will inevitably take place.
Sunday, April 22, 2012
Version 0.1.4.4 - Combat is almost completed. Here are some key concepts relating to the combat model:
.png)
1) Situational Awareness
Each brigade has a situational awareness level that determines its ability to detect the enemy during combat. Whenever a unit moves to a new hex, its SITA drops to a level determined by the owning nation and control of the new hex. If a unit moves into a hex belonging to the enemy and controlled by the enemy, its SITA will be much lower than if it is a friendly owned / controlled hex. This is to reflect regional familiarity and support of the locals.
Every turn a unit remains in the same hex, its SITA will increase. Dedicated recon missions will also increase SITA. When combat begins, the relative SITA of each side will determine who shoots first and is also used in the combat effectiveness calculation. Because of the high lethality of the weapons systems, the first side to fire will often gain the upper hand in an otherwise even battle.
2) Form Up Position
When units enter an enemy hex, they do not immediately engage in combat. Instead, they move to a Form Up Position or FUP. This is a position just outside direct contact with the enemy from which various operational missions can be launched. A unit in this position is considered committed to combat and will pay a penalty in movement points for withdrawing back into the cell from which it entered known as the withdrawal hex. In game terms, the unit is shown in the combat hex with a pointer showing the hex 'edge' that it occupies.
When a combat hex is clicked on, the Combat Panel appears with a blown up view of the hex along with all invading and occupying units shown in their respective positions. Occupying units do not have a specific edge but are considered to be spread around the perimeter to engage any enemy units in a FUP.
The command button is pressed and a list of all valid commands for the current hex appears. After clicking the command, you may select one or more units and then click the execute button. At that point, 1-10 rounds of combat will take place depending on user selection (set by typing keys 1-0). Each round will use approximately 25% of available units from each selected corp which are rotated to the front on a least recently used basis. The standard setting is 4 rounds per execution which will generally use every brigade in each selected corp once. However, as brigades are degraded due to lack of supplies, casualties, drop in morale or simply run out of movement points, etc, it may effect the actual number of participating brigades.
The unit details screen shows the last combat round that each brigade has engaged in and can be used to determine which units are likely to be selected next. Units whose morale drops below a certain threshold will retreat or break and immediately withdraw from combat. If either side loses all combat units from a hex, the other side will immediately take control of the hex and combat will be completed. Any leftover non combat units (usually HQ's) will be forced to perform a hasty withdrawal or captured / destroyed if there is nowhere to run.
Only 3 units may occupy a single edge at a time which allows a total of 18 units to engage in the invasion of a single hex at one time. The defending side may have up to 6 combat units and any number of non combat units. Units in a FUP may only withdraw to the hex from which they entered, this is the withdraw hex. If an enemy unit enters the withdraw hex the unit is cutoff and force to make an immediate hasty withdrawal to any available friendly controlled hex with penalties in casualties and moral. If no friendly hex is available, the unit is destroyed.
3) Strategic / Operational Commands
There are two basic types of commands: strategic and operational. Strategic commands span multiple map cells. So moving from one cell to another, patrolling a group of cells or bombing a cell would all qualify as strategic commands.
All commands executed from within the same cell are considered operational commands. Recon, assault and artillery bombardment would be examples of operational commands.
Here is a quick example of the combat model in action:
A lone Spanish militia corp is defending a small town in clear terrain against an attack by 2 French infantry corps and a French armored division. The militia corp has no artillery support, no long range weapons and is of lower morale and training than the invading forces making this a very one sided battle.
The invaders are attacking from 2 sides forcing the defending unit to split their forces in half to cover the front. Since the invaders have just entered their FUP's they have very low situational awareness so the defender gets to fire first.
However, since the attacking infantry corps each have 4 division containing an artillery brigade each the first action is a round of bombardment by the artillery. And since this is clear terrain and non urban infrastructure, the armored division is able to attack at long range allowing 2 rounds (artillery barrage and long range high caliber direct fire) of attack before the militia unit is able to respond.
Once these rounds have completed, the attacking units close the gap and engage the militia at close range. At this point the militia unit is able to fire first but its far too little too late and the responding short range fire by the attacking units aided by the shock value of the armor overwhelms and breaks the militia unit which immediately executes a hasty retreat. This hasty retreat results in more casualties, some captured units and a complete collapse of morale.
The armored unit which still has plenty of movement points can continue to pursue this retreating unit or engage in other operations elsewhere.
Here is the final battle summary:
.png)
You can also scroll down through the detail to get a blow by blow description of the battle.
Monday, March 26, 2012
I've been working on version 0.1.4.2 for about 2 weeks now. Its a pretty large release and probably should have been broken into 2 or 3 in retrospect.
There were three main goals with a fourth one emerging in the middle of development:
1) Add the first operational command: Assault
Assault is the most basic attack command. Once a unit has reached the form up position (FUP) combat can occur. At this point, the invading player is considered to be on the border of the combat cell while the occupying player is considered to be in the middle of the cell had will have automatically formed a defensive perimeter along all invaded hex sides.
2) Implement the combat control panel.
This panel pops up when a combat cell is clicked on. It shows a blown up view of the hex along with all active invading and occupying forces. The active player clicks on the combat list button which then brings up a drop down list of all available commands. Once a command is selected, the units that can participate are highlighted and the user can select as many or as few as needed. If the occupying player is active, he also must select a target side to attack. Finally, the execute button is clicked and the combat is calculated and displayed in a multi line text toolbar that the user can page up and down through to see the results.
3) Implement the combat model.
This is the first stab at implementing the actual combat. However, as soon as I started, I realized that it would be nearly impossible to implement without really good feedback on the effect of the combat on the units themselves. This led to the need for number 4.
4) Implement the unit details panel.
This was originally going to be part of 0.1.9 - Complete the Interface. However, it makes much more sense to at least have a preliminary version done now so I can see what is happening to all the affected units. The problem here is screen space.
The combat panel and combat results panels take up 2/3rds of the minimum screen while the main, cell info and unit info (not the same as unit detail) toolbars take up the rest. After playing with a few pretty iffy ideas I came to the conclusion that there are 2 reasonable alternatives:
A) (preferable) There is currently about a 450 x 200 rectangle of unused screen space below the combat panel that could possibly be used to display the unit detail information. If this is big enough, I will use that.
B) Hide the main / cell / unit toolbars and replace the free'd area with the unit details toolbar while it is being views. This is a bit more complicated but doable and would afford me a lot more space than (A).
Either way, once this is done, I can begin implementing the actual combat model. At this point, I will start to have the first glimpse of a playable game although without a supply model or victory conditions.
Thursday, March 8, 2012
V 0.1.1 Replay Video
Here is a quick demo of the replay capability just completed in v 0.1.1:
Unfortunately, the screen capture software does not capture the mouse so I will need to annotate these videos once I find a good tool.
Tuesday, February 21, 2012
I've made some progress so I thought it would be time for an update.
2 commands have been added:
1) Move - this will move your unit but only in friendly controlled territory. This is useful for moving units around within your own territory without it accidentally getting involved in combat.
2) Advance - this will move your unit in friendly or enemy territory. This command is used to move to contact with the enemy without actually engaging them.
Both commands work with any units that have Foot, Motorized or Tracked as their mobility type.
Commands can be stacked on top of each other with each one starting where the previous one left off. They can also be much further than the range of the current turn. During the automatic movement phase, any available moves will be attempted before the player gets control.
So for example, a unit could be created in the US, move by rail to the coast, move by sea to the UK, move by rail to another port, transfer to amphibious transport, land on the beach in Normandy, drive to Paris. This could all be set up in 1 turn and as each new turn begins, the unit will attempt to execute the next leg of its journey until it reaches conclusion or is blocked.
An example of being blocked would be a unit is given a Move command which is valid at the time it is ordered but before it reaches its destination, one of the hexes on its route is taken over by the enemy. At this point the unit will stop at the hex before the illegal hex.
You can delete all the commands by selecting the unit and hitting the delete key. So for the example above, you could delete the blocked move and then give the unit a new command, for example an advance that would now allow it to travel through enemy territory.
Also added is a red dashed border to display the front line between friendly and enemy controlled territory.
Monday, January 9, 2012

Here's a recent screen shot. I like the look of the map. The toolbar elements are ok but I just can't keep wasting time on re-skinning the whole interface. Fortunately, everything is image driven so it would be easy for a user to redo the entire interface as long as they stick with the size constraints.
The 10 buttons are displayed in play mode. They are (right to left, top to bottom):
1) Unit Production
2) Economy
3) Diplomacy
4) Research
5) Espionage
6) Trade
7) Options
8) End Turn*
9) Save Game*
10) Exit*
* implemented.
Obviously, everything is in a development state. But this is probably the look I'm going with.
As far as development of the game itself, I've added pathfinidng, rangefinding and a movement command. You can now click on a unit, right click on a target hex and select move from the dropdown menu. The unit will plot the shortest path and move to the new location.
Rangefinding will get a list of all cells within a given range of a source cell. Currently this is being used to allow the editor to fill in multiple cells at one time.
The editor has the following layers implemented:
1) Land type
2) Terrain
3) City
The next one up is rail. This will be edge based so it will be a bit trickier than the previous 3 that are all cell based. Rail will also include setting the infrastructure level of a cell which can have 1 of 4 levels:
0 - Little or no infrastructure. Possibly some roads and trails and small villages. No ports, or major roads or population center.
1 - Rural. Some roads, lots of small towns and villages and farmland in clear areas.
2 - Suburban. Better roads, rail and medium to large population centers.
3 - Heavy Urban. Very large population centers. Large, well developed areas with heavy infrastructure including large roads and bridges, heavy rail, factories, large appartment buildings and other heavy structures that can be used to provide cover and heavy resistance to invading units. These will be the most defensible hexes in the game.
There will be 2 types of rail. Russian and European. Only significant on the Eastern Front where invading armies will have to take the extra time to convert over rail which will slow up progress invading. Even though the US had a different sized rail, there is no point including it as it will never have to link up with non US guage rail.
Subscribe to:
Posts (Atom)